

I Had my first actual Birthday cake to bake the other day, it was for my niece, she is turning 3 on saturday. I was a bit stressed as to how it would turn out but sure enough it looked just fine when it was finished. So here goes... first i baked to 23cm square madeira cakes it was approximately 4cm high then i put it in the freezer for a couple of hours. When i was sure i would be able to cut it nicely i took it out and placed butterfly template over it secured it with pins and cut it out. I then put some apricot jam all over the cake so that the fondant i was going to work with next would stick. I tinted fondant pink, purple and yellow and began rolling, when i was sure it was big enough to go over the cake i placed it over. Then i did the other wing and finally the body. At first i thought it would be quite tricky, but i did the two wings first on the cake board and then i did the yellow body part seperately and then with a spatula i slid it in between the two wings. It worked just fine... Finally i decorated it with some more fondant and made a border with royal icing as well as the antenae... Oh and i also cut the name out of fondant with letter stencils.


Wednesday, March 25, 2009
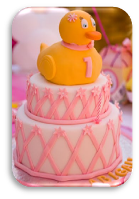
Pretty Birthday Butterfly
Tuesday, March 17, 2009
Testing Testing 1...2...Cars!!


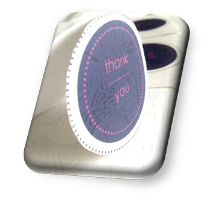
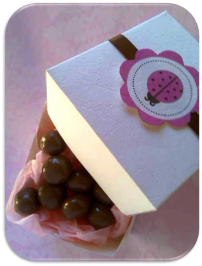
Chocolate gift box for grandma...
Ons Sunday we went to my Grandmother, she had her birthday in the week and i wanted to bring her a cake seeing as i am able to bake one these days...I saw this chocolate gift box with cake balls on a few blogs and in different cake decorating books so i decided that was what i would bring her. It came out ok... it was quite difficult to get the border around without it sticking to the itsself, but it tasted very gooood!!!


The Chocolate was cracking a bit dont know why, maybe it was the brand of chocolate i used...
Pink Candyfloss Cupcakes
I decided i would like to make some cupcakes, and decorate them with candyfloss!! Now, i made it, but the candyfloss "melted" away on the cupcakes but luckily i could take some photos before it was all gone... 


Tuesday, March 10, 2009
Meet Lill Suzy!!
Meet lill Suzy, she just loves baking... And from now on watch out for her she will be popping up from time to time!!
Oh, and almost done with the cupcakes... got held back because of this silly flue but i had to introduce you to Lill Suzy first... Have a nice day ♥♥♥♥
Friday, March 6, 2009
And yet another fondant cake
I gave the Fondant decorating another shot, this time with a lace/doilie effect! Must say it was tons of fun making it, i only used a flower cookie cutter and piping tips to cut out the designs in the white fondant. I will post some more photos of the cake on the weekend and stay tuned for my cupcakes i have a sweet as sugar idea!!


Monday, March 2, 2009
A new spin on the “cupcake” – the 5 min MUG-cake

4 Tablespoons sugar
2 Tablespoons cocoa
1 Egg
3 Tablespoons milk
3 Tablespoons oil


 You can have it just like this or pour some chocolate ganache over it!
Sunday, March 1, 2009
Hello Kitty & SpongeBOB
In the beginning of the week i saw these cute as a button hello kitty cake pops on a blog named bakerella (http://www.bakerella.com/) so i just had to make them for myself and that is exactly what i did. But while i was thinking of making them it occured to me that this could possibly be done for another lovable character, yes spongebob!!! What can i say, i tried it was tons of fun and it tastes even better!!!


crush the oreos and mix with the cream cheese, make balls and press out squares using a cookie cutter. Use the eeny meeny miny mo's for the nose and also insert a stick.
Next let it cool in the fridge for about an hour
melt the chocolate in a cup so that there is enough room to dunk,add yellow food colouring dunk and shake off excess. Return them to the fridge. Cut out the eyes and teeth from white and blue fondant and "glue" using melted chocolate, draw in the rest with the edible ink food writer and there you go...